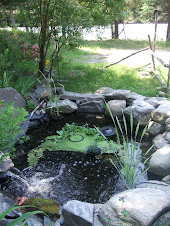
BUILDING A GARDEN POND
It's a big endeavour, but an oh so VERY satisfying and rewarding. There are lots of great articles out there on this topic, the below of which is one of them and I found useful:
Call a couple of friends, provide the cold drinks, and it's a project which can be done. In order to prepare in advance, you'll need shovels, a pond underlayment and liner, coping stones, decorative items, plants, a pump, a filter system, a dechlorinator, and a package of bacteria. Yes, you heard me right - bacteria!
Where Should You Locate Your Pond?
The first step in your goldfish pond project will be to find the best location for it. In order to do so, here is a list of things to keep in mind:
* You will need a power supply, so pick a site which is near one.
* Don't put it at the bottom of a slope where chemicals from the yard and garden can be washed down into it.
* Keep away from shaded areas. Your garden needs at least 4 hours of sunlight each day.
* It might seem nice to build your pond nestled near a lovely tree, but don't do it. Leaves and debris falling from the tree will be messy and cause you a lot more maintenance work.
Grab a Shovel and Dig In
Once you've found the site where you want to build your goldfish pond, it's time to think about its size and shape. Make sure you plan a large enough pond so that your goldfish have plenty of room to swim. You'll also want different depths in your pool making some parts deeper and others shallower, just as a pond would be in the wild.
The minimum depth for your pond should be at least two feet, and then only if you live in a mild to moderate climate zone. Otherwise, your pond will need to be deeper. In cold climates, you have to allow at least 12-16" of water that lies below the depth of the surface water that will freeze during winter
The hardest part of the job is going to be the digging, but that's why you invited friends. After laying out the shape you want, and telling your helpers exactly what it is you want, you can all start digging. Keep in mind that your goldfish pond needs to have a ledge running around all sides. This ledge should be 1' wide and 1' deep. In addition, you need to dig a sloping area towards one end so that you'll have a place to install your waterfall.
Before you finish your digging, you need to position your external pond filter and pond skimmers. First they need to be placed and leveled. Then you need to dig two ditches: one from the external pond pump to the skimmer, and one from the pump to the waterfall.
Get in Line!
After preparing the hole, the first thing you're going to put into it is the pond underlayment. This is a lining material that keeps the pond liner from moving. The underlayment can be cut to size and pieced together with tape if need be. Once it's in place, you can add the rubber pond liner. Place it in the hole, position it, and smooth out as many folds as you can. If a few folds remain, you can correct that later. Be careful when placing large boulders onto the liner - sliding and pushing them can rip the liner and be a source of water leak.
Now on to the Good Stuff
Once the liner is all in to your satisfaction and up against the pond filter, it's time to get creative. You get to add waterfalls and streams. Design them so that they will flow directly into the pond. Wherever you want a waterfall, use mortar or expandable foam to secure a rock there. When the water comes on, it will flow over the rock, and you'll have an instant waterfall. Make sure the pond liner is underneath all of the waterfall structures though, otherwise you will slowly lose water through leakage in tiny cracks in the rocks, etc.
The final steps in the basic installation will be to hook the liner to the skimmer and install all of the pipes. Use the instructions provided, and you will be finished before you know it.
A Pond that is a Reflection of You
Now we come to the decoration. You will want to create an environment around your pond to make it look natural. For an edging, you can lay coping stones. They should be slightly higher than the edge of the water when you lay out an outline. While you're laying the rock, make sure to tuck in all ends of the liner so that it won't show. Use your own judgment on whether you think the rocks will stay in place on their own or if you need to add a little mortar for more stability.
In your decorating, try to make everything as much like nature as possible. Add a little shrubbery around the edges, but make sure you don't get carried away. You don't want your shrubbery to grow up to overwhelm your pond or block the view. You can even create a small beach for your pond with using cobblestone and gravel.
The End of the Road
Now's the time to fill your pond with water. Make any adjustments that need to be made, and continue filling until the water is within a few inches of the top. You can add or remove wrinkles in order to make things fit well. A dechlorinator should also be installed which will eliminate unwanted chlorine from the tap water.
Line the bottom of the pond with gravel, and immediately add water plants. Anacharis, a plant that fights algae and filters the water, is a good one to add in abundance. You'll also find that water lilies provide shade for fish on hot, sunny days. And, lastly, you're going to add a package of bacteria to the pond and filter in order to start the bacteria cultures your ecosystem is going to need.
After you've added everything but the fish, you need to wait a few weeks for everything to balance out, for bacteria to grow, and for nutrients the fish will need to develop. In other words, you want your pool to be just like a woodland environment before putting fish in their new home. After the waiting period, bring on the fish. You'll be able to spend hours enjoying your new goldfish pond.
Article Source: http://EzineArticles.com/?expert=Christopher_W_Smith
Friday, March 12, 2010
Subscribe to:
Post Comments (Atom)


I wish I'd read this advice before starting my pond project, especially the part about inviting a couple of friends. I looked at it as a weekend project, but with just one shovel, and just one of me moving the rocks around, it was a good month to get to the putting the water in part; in hindsight, a few friends coming over to help out would've really cut down on the digging time. It is lovely now, and provides a lot of pleasure, work and time invested that really paid off. Happy ponding!
ReplyDeleteThey said that the best pond liner to use is the used billboard tarps?
ReplyDelete